Robot Guide
Comprehensive guide to understand Robots

SUMMARY :
- What’s a Robot?
- What do Microshare robots do?
- What can I do with them?
- How do I use them?
- A. Accessing the UI
- B. Basic code
- C. Triggered vs scheduled
- D. Testing
- Create a Robot to Transform data and Send alerts
- How do they work?
- More Information
1. What’s a Robot?
A Robot is an actor that automates the tasks associated with transforming, enriching, and annotating your data. Robots can interact with services to feed and pull data from external systems. A single Robot typically automates a single task. Keeping each Robot simple ensures that it will be: easy to maintain, fast and efficient with higher throughput, and reusable in multiple scenarios.
Robots can be triggered by the arrival of new data into the Microshare data lake, timed to run at preset intervals, or react to external events such as the arrival of a data file or connection of a web socket. Robots run in parallel and react to events as they occur. In most cases, a Robot will react to an event by reading a Microshare record, acting on it in some way, and writing a new record back into Microshare.
2. What do Microshare robots do?
There are two general types of ready-made robots that Microshare deploys to its client configuration - notification and pipeline robots.
Notification Robots
Microshare provides two flavors of notification robots.
The Value Monitor robot is configured to watch the value of a specified field in new share records created in a recType. If the value is greater than a specified maxValue OR less than a specified minValue OR matches one of a set of values, then a notification can be sent to a list of recipients.
For example, a Value Monitor robot can be installed and configured to send notifications
- when a visitor has pressed a button on a feedback device
- when the temperature in a refrigerator exceeds a certain threshhold
- if a door is opened during non-business hours
- if the carbon dioxide level in a room exceeds a threshhold
- etc.
The Rate Monitor robot is configured to monitor changes over time to a specified field in new share records created in a recType. Notifications are send when the value changes by more than a specified threshhold during a specified time interval.
For example, a Rate Monitor robot can be configured to send notifications
- when more than rateThreshold motion events have occurred in thresholdDurationInMinutes minutes
- etc.
The Value Monitor and the Rate Monitor robots can be configured to ‘throttle’ notifications so they are sent less frequently. It can also be configured to send notifications to different user(s) (or not at all) depending on the time of day, day of the week, location or one or more metaTags.
Pipeline Robots
Microshare employs various pipeline robots to process data and generate a new format that is easier for the next stage in the pipeline to consume.
3. What can I do with them?
If you are developing your own robot(s), keep these tips in mind. To keep your data workflow simple, each Robots should only take a single action. Below are some typical use cases:
For Robots tasked to pull or receive data sent by an external source.
- CSV files dropped in a target folder
- active web socket connection to a remote server
- interacting with an external service via API
2. Data parsing
Often managed within a data workflow to enrich records as they stream through.
3. Data transformation
Perfect for decoding a formatted IoT payload.
4. Data formatting
Prepare your data to be used by an external system or in a dashboard.
For a Robot used to trigger another service on the web.
4. How do I use them?
A. Accessing the UI
From the management console available here, open the Manage -> Robots panels. Create and edit your Robots here.
B. Basic code
Inside of a Robot, it runs a JavaScript script. When you create a robot, there will be some auto-generated example code present.
It will include the basics required to run a robot:
  var lib = require('./libs/helpers');
  function main(text, auth) {
  }
The require method loads the library of functions your Robot will be able to use, and the main function is what is run when the robor is triggered, so it should encapsulate all of Robot’s actions. Other functions can be used, but this is is the primary function called.
main has two parameters:
textis the metadata about the event that triggered the Robot.authis your auth token to allow this Robot to access the data lake on your behalf.
For more code samples, refer to the Robots Library.
C. Triggered vs scheduled
Triggered is the default state for a robot which means that it will be activated each time a record with its record type is added to the data lake (provided it has access to the record). The record type of the robot must match the triggering record type.
Optionally, your Robot can run on a schedule, without waiting for a new record to be created.
Delay time will run your Robot once after the specified amount of time, the countdown starts when you activate the Robot.
Interval time triggers your Robot periodically every interval, forever.
Set the Delay and/or Interval times, activate the checkbox (ticked means on), sit back and relax.

D. Testing
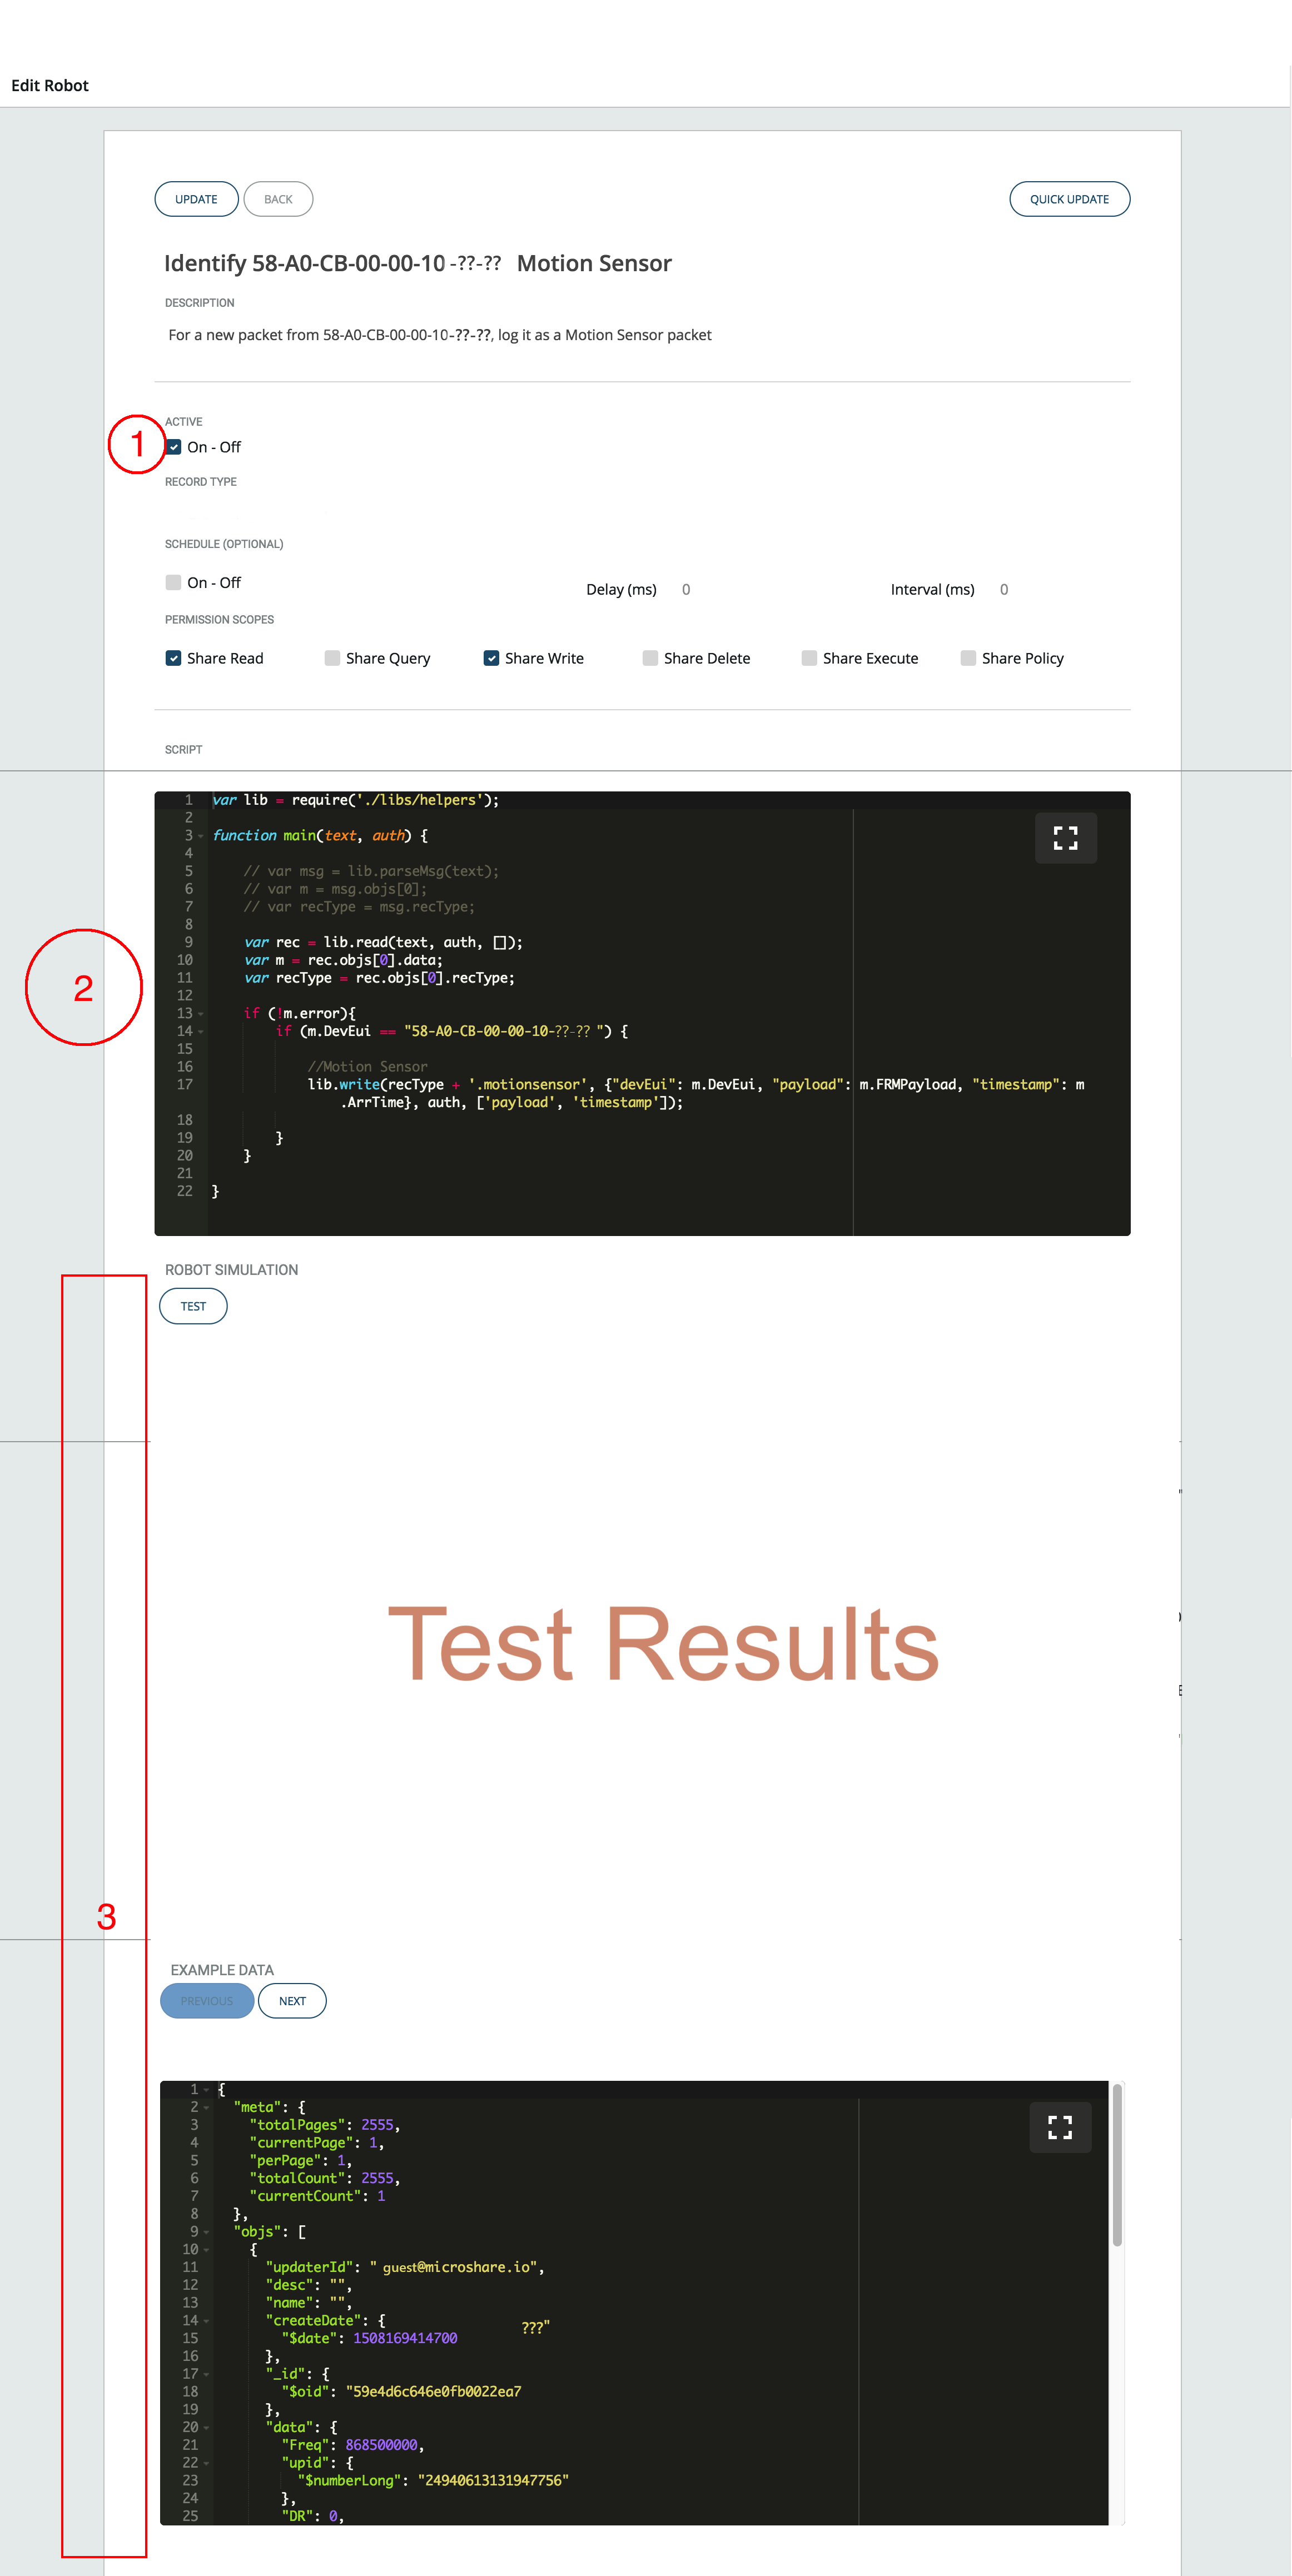
If you edit an existing Robot, you will see that a testing panel is present. Follow the instructions to simulate a run of the Robot with sample data. It will provide an output for your test run. Important: the lib.write does not write a new record when used in a test, so you are not at risk to pollute your data.
5. Create a Robot to Transform data and Send alerts
Robots can be chained together to meet many use cases, here we will configure two Robots to detect an abnormal temperature level, and send email notifications.
- Navigate to Microshare platform
- Click the
Managebutton in the top toolbar - Click the
Robotsbutton in the left toolbar and clickCREATE

We will do the minimum to unlock all the Robot options for now.
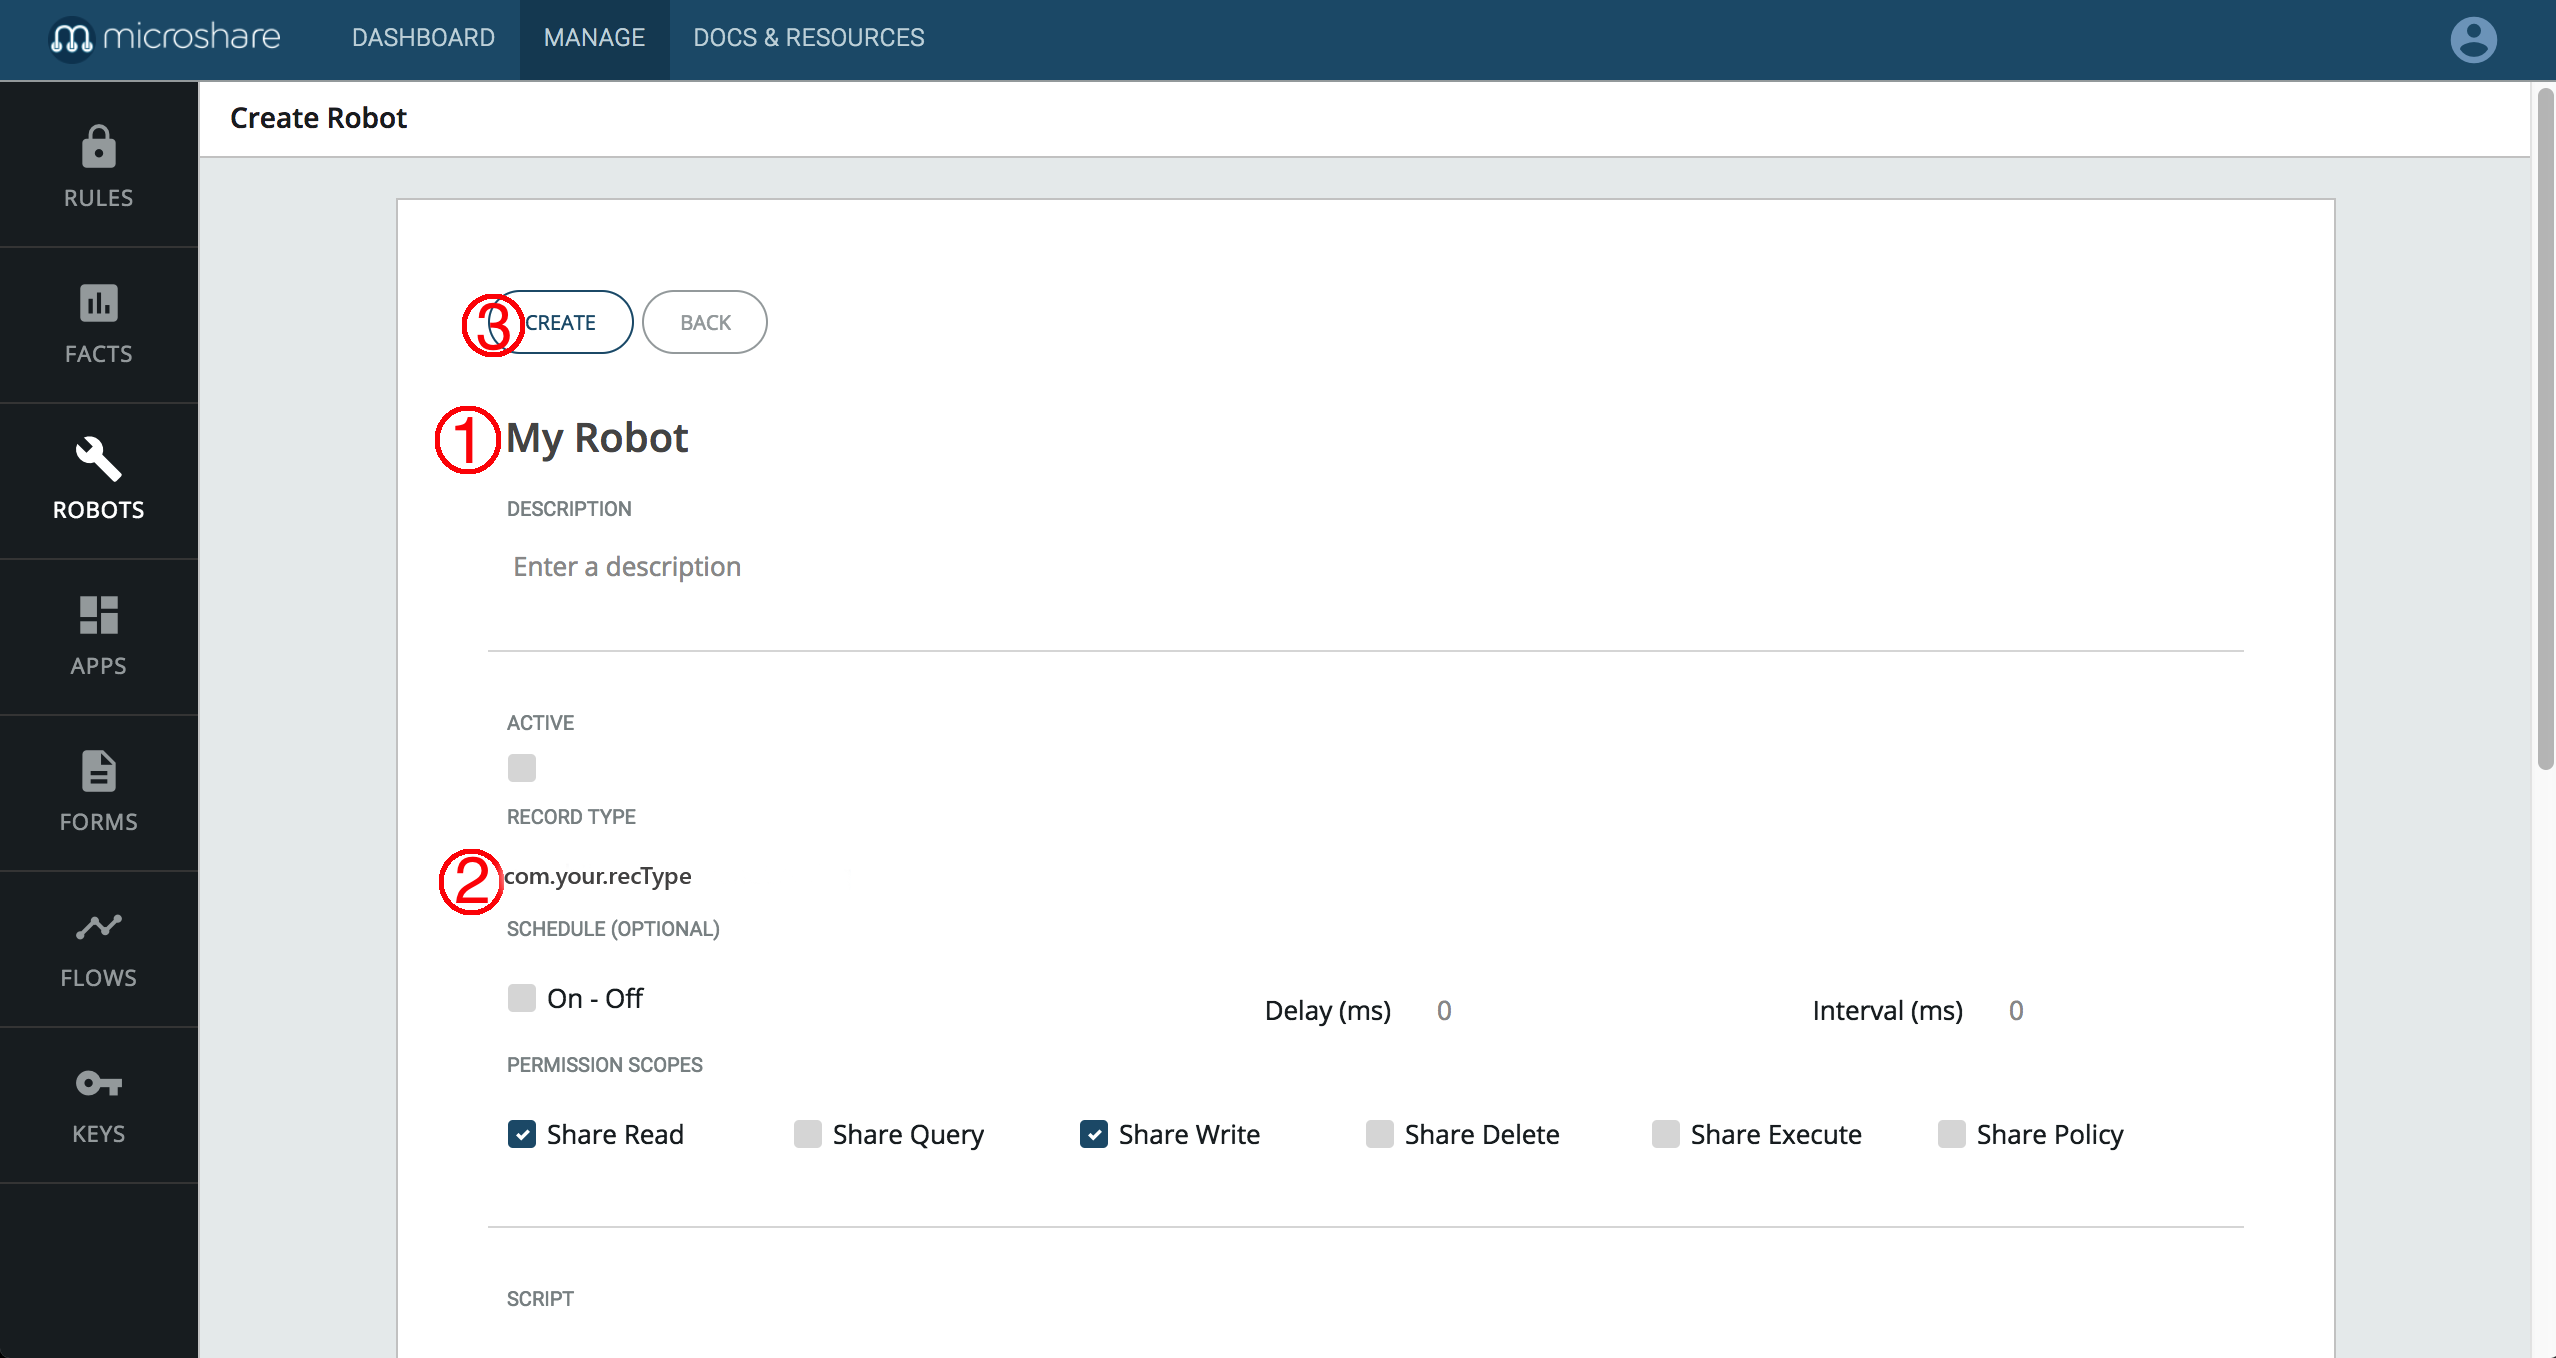
- Give your Robot a name.
- Enter the Record Type you used in the calls in the previous section.
- Complete the creation by clicking the
CREATEbutton, and entering your login, password and API key combination.
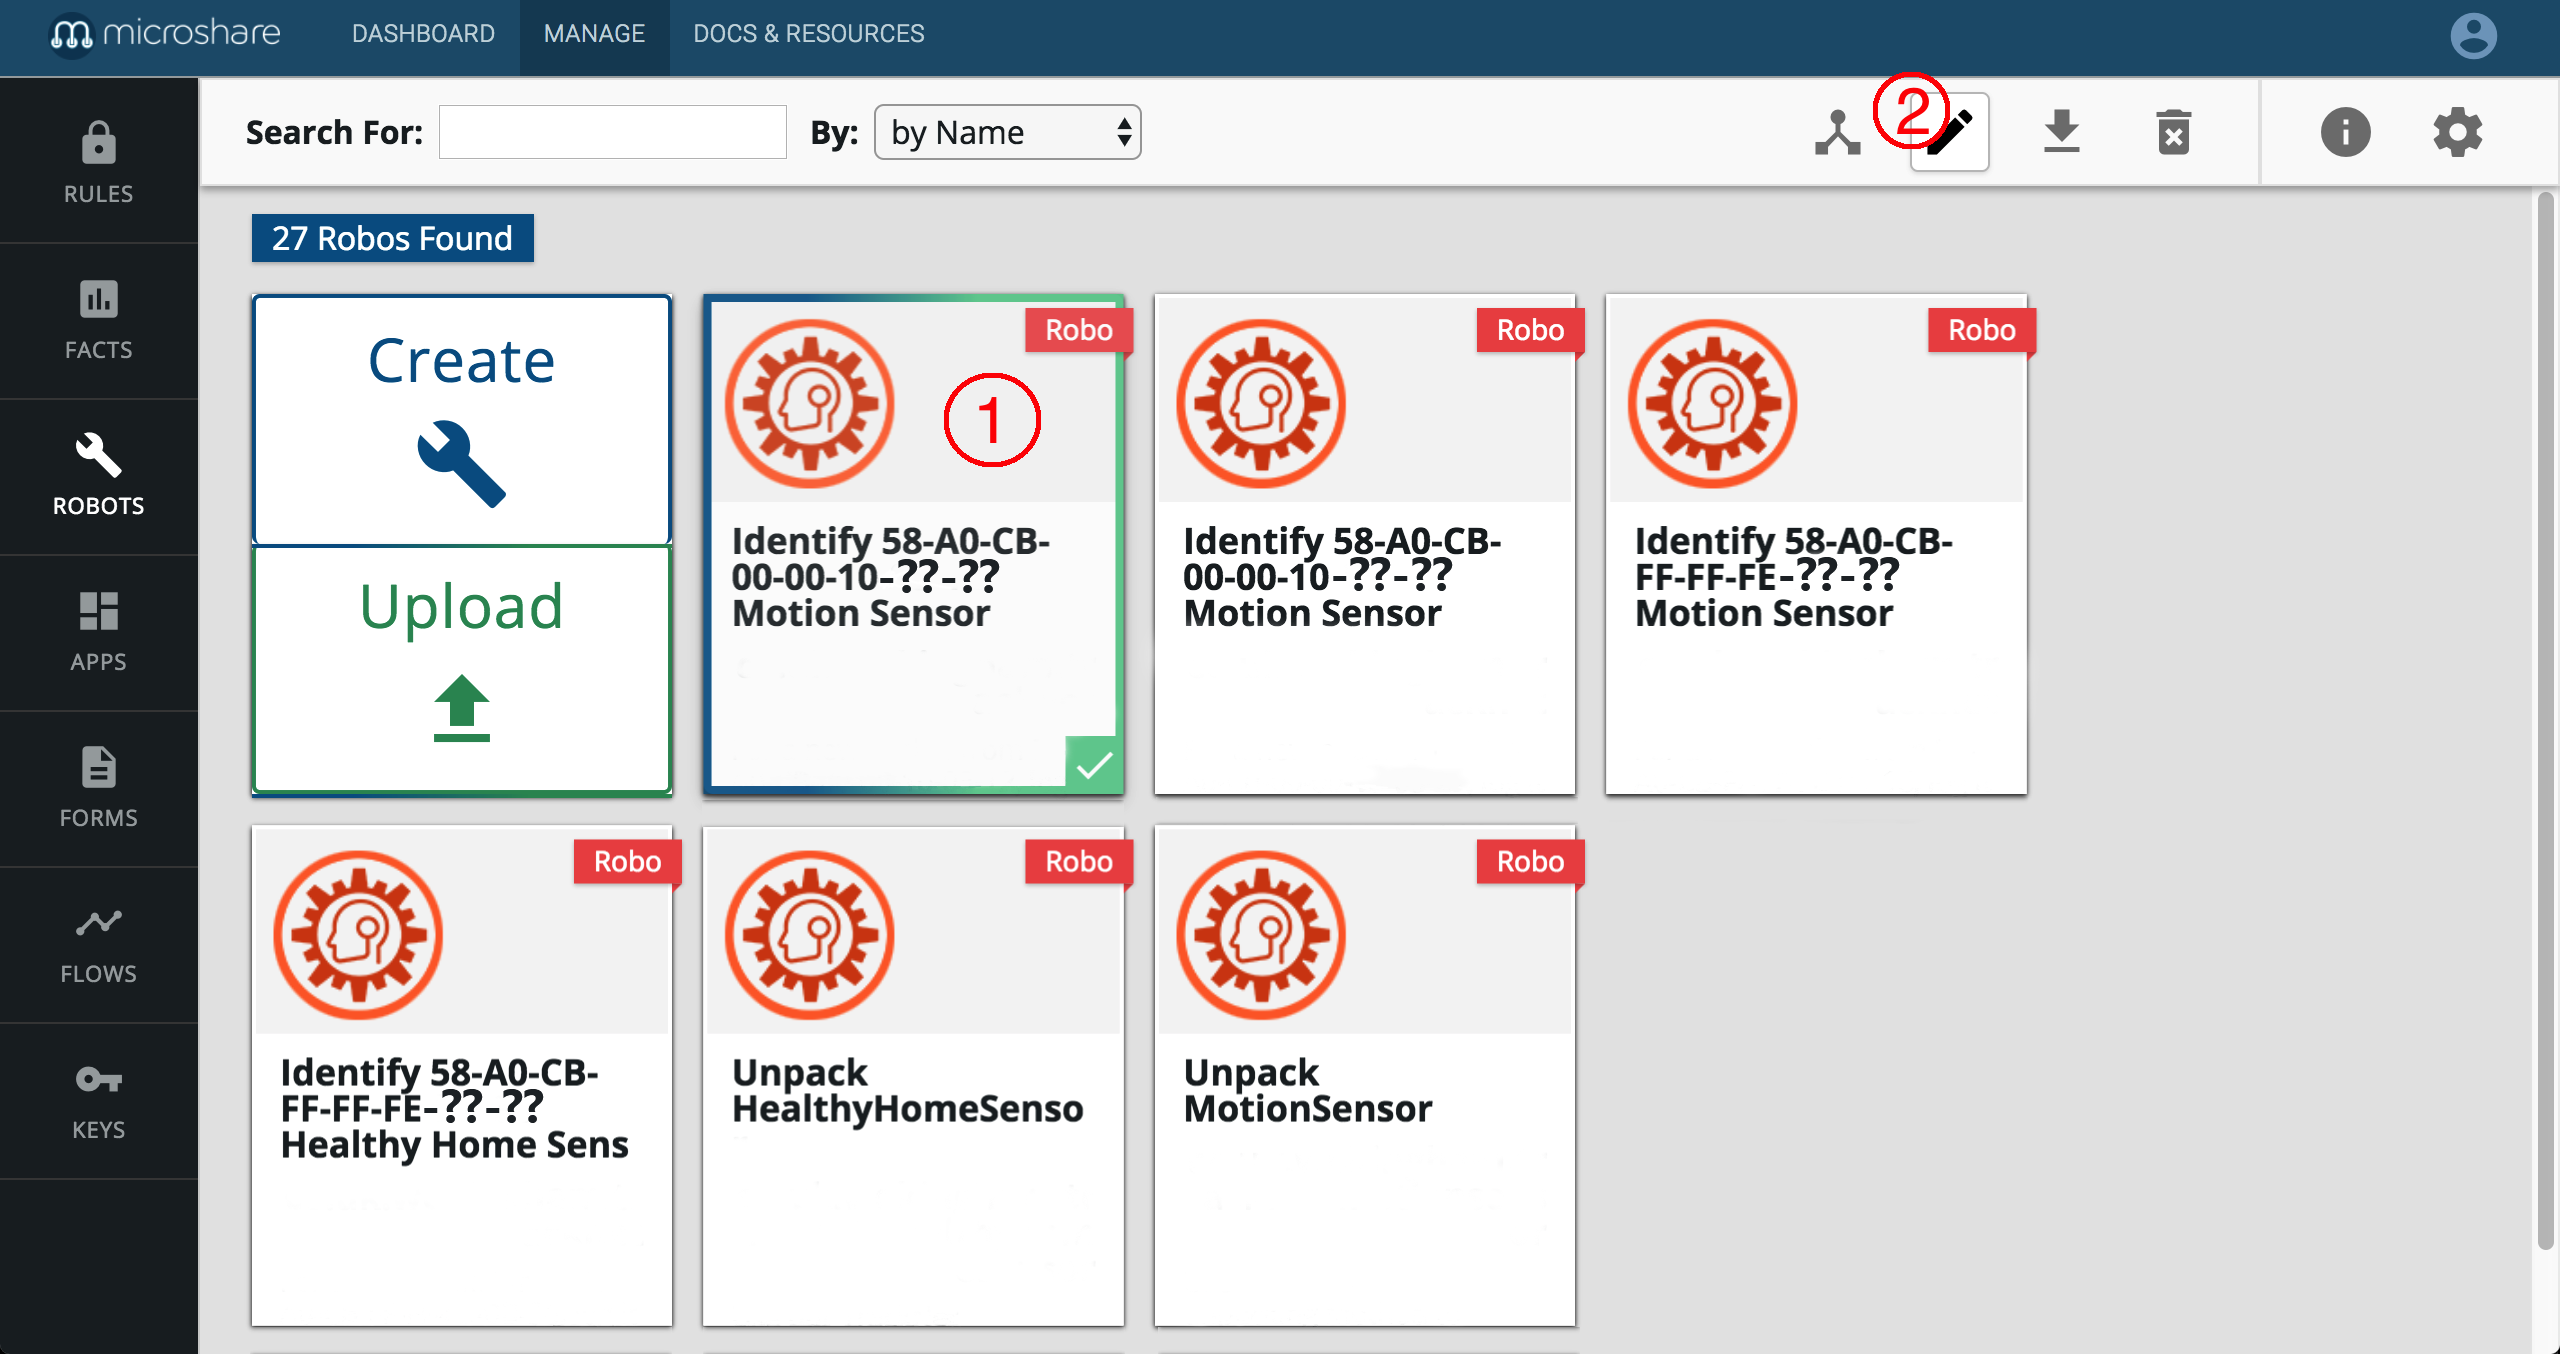
You’ll be back in the Robot cards list and your Robot should now be displayed.
To edit an existing Robot, find your Robot in the list:
- Click on it
- Click on the
pencilicon at the top of the page
While in edit mode you can:
- Turn your Robot on and off
- Write the Robot script
- Test the script
We don’t have real data to use here, so we going to transform it with our own mock data. We are going to add a mock temperature value, and the current date/time to the record, then save that transformed record.
- Replace the code in your Robot script with:
  var lib = require('./libs/helpers');
  function main(text, auth) {

      var rec = lib.parseMsg(text);
      var newData = rec.objs[0].data;
      var recType = rec.objs[0].recType;

      var now = new Date();

      newData.temperature = now.getSeconds();
      newData.dateTime = now.toString();

      lib.writeShare(auth, recType + '.withTemperature', newData, []);

  }
Activate and update your Robot when done. It will now be triggered automatically to read, enhance, then write back a record to the data lake, with the added .withTemperature suffix to the recType field.
You can test that your Robot triggers by writing a new piece of data with your initial recType, and read the recType.withTemperature with the API.
You can use that second recType as the trigger to another Robot for data transformation, etc.
- Create a new Robot
- Give your Robot a name
- Enter the Record Type with the
.withTemperaturesuffix - Complete the creation by clicking the
CREATEbutton, and entering your login, password and API key combination - Now edit that Robot, and replace the script with:
var lib = require('./libs/helpers');
function main(text, auth){

    var rec = lib.parseMsg(text);
    var data = rec.objs[0].data;

    if (data.temperature > 30){

        /* lib.sendMicroshareEmail(recipient's email address,
            subject of your email,
            body of your email);
           The email sender will be notification@microshare.io
        */

        var TO = 'INPUT YOUR EMAIL HERE';
        var SUBJECT = 'High temperature alert';
        var BODY = 'A temperature of ' + data.temperature + ' was detected at ' + data.dateTime;

        lib.sendMicroshareEmail(TO, SUBJECT, BODY);

    }
}- Within the code pasted into the “Script” section change the variable “TO” to your email
- Activate and update your Robot
- Write a few records for your recType
The two Robots are activated in succession. If the mock temperature created is above 30, you will receive an email alert.
You are now ready to setup your own IoT data stream, and transform, analyze, and get alerts on data.
6. How do they work?
Behind the scene, each Robot is an Akka Agent loaded with its ECMAScript 6 compatible script.
Our Java Stream-Service is able to set up, start, and stop Agents; and leverages the Oracle Nashorn JavaScript engine to compile the ES6 scripts.
The Java libraries accessed by the Robots point to the adequate Service to read and write in the data lake.
7. More Information
For additional details on available Robot methods, visit Robot library
For help on how to route your IoT stream from your favorite platform or gateway to Microshare, check our Data ingestion documentation.